Fastened and Bonded Joints
Structural joints are defined on the FEM with HyperX. Different FEA loads processing techniques are provided to analyze and design fastened, riveted, and bonded joints – concurrently with panels.
Capability Pages
Introduction
HyperX provides various different joint designs and the ability to evaluate their feasibility. Bolted joints can automatically size fastener type, diameter, spacing, rows. Bonded joints can size adhesive material and thickness, overlap length, and taper angle.
Different joint concepts could be used for different skin areas. For instance, highly loaded joints may require fasteners, whereas lightly loaded joints may be bonded.
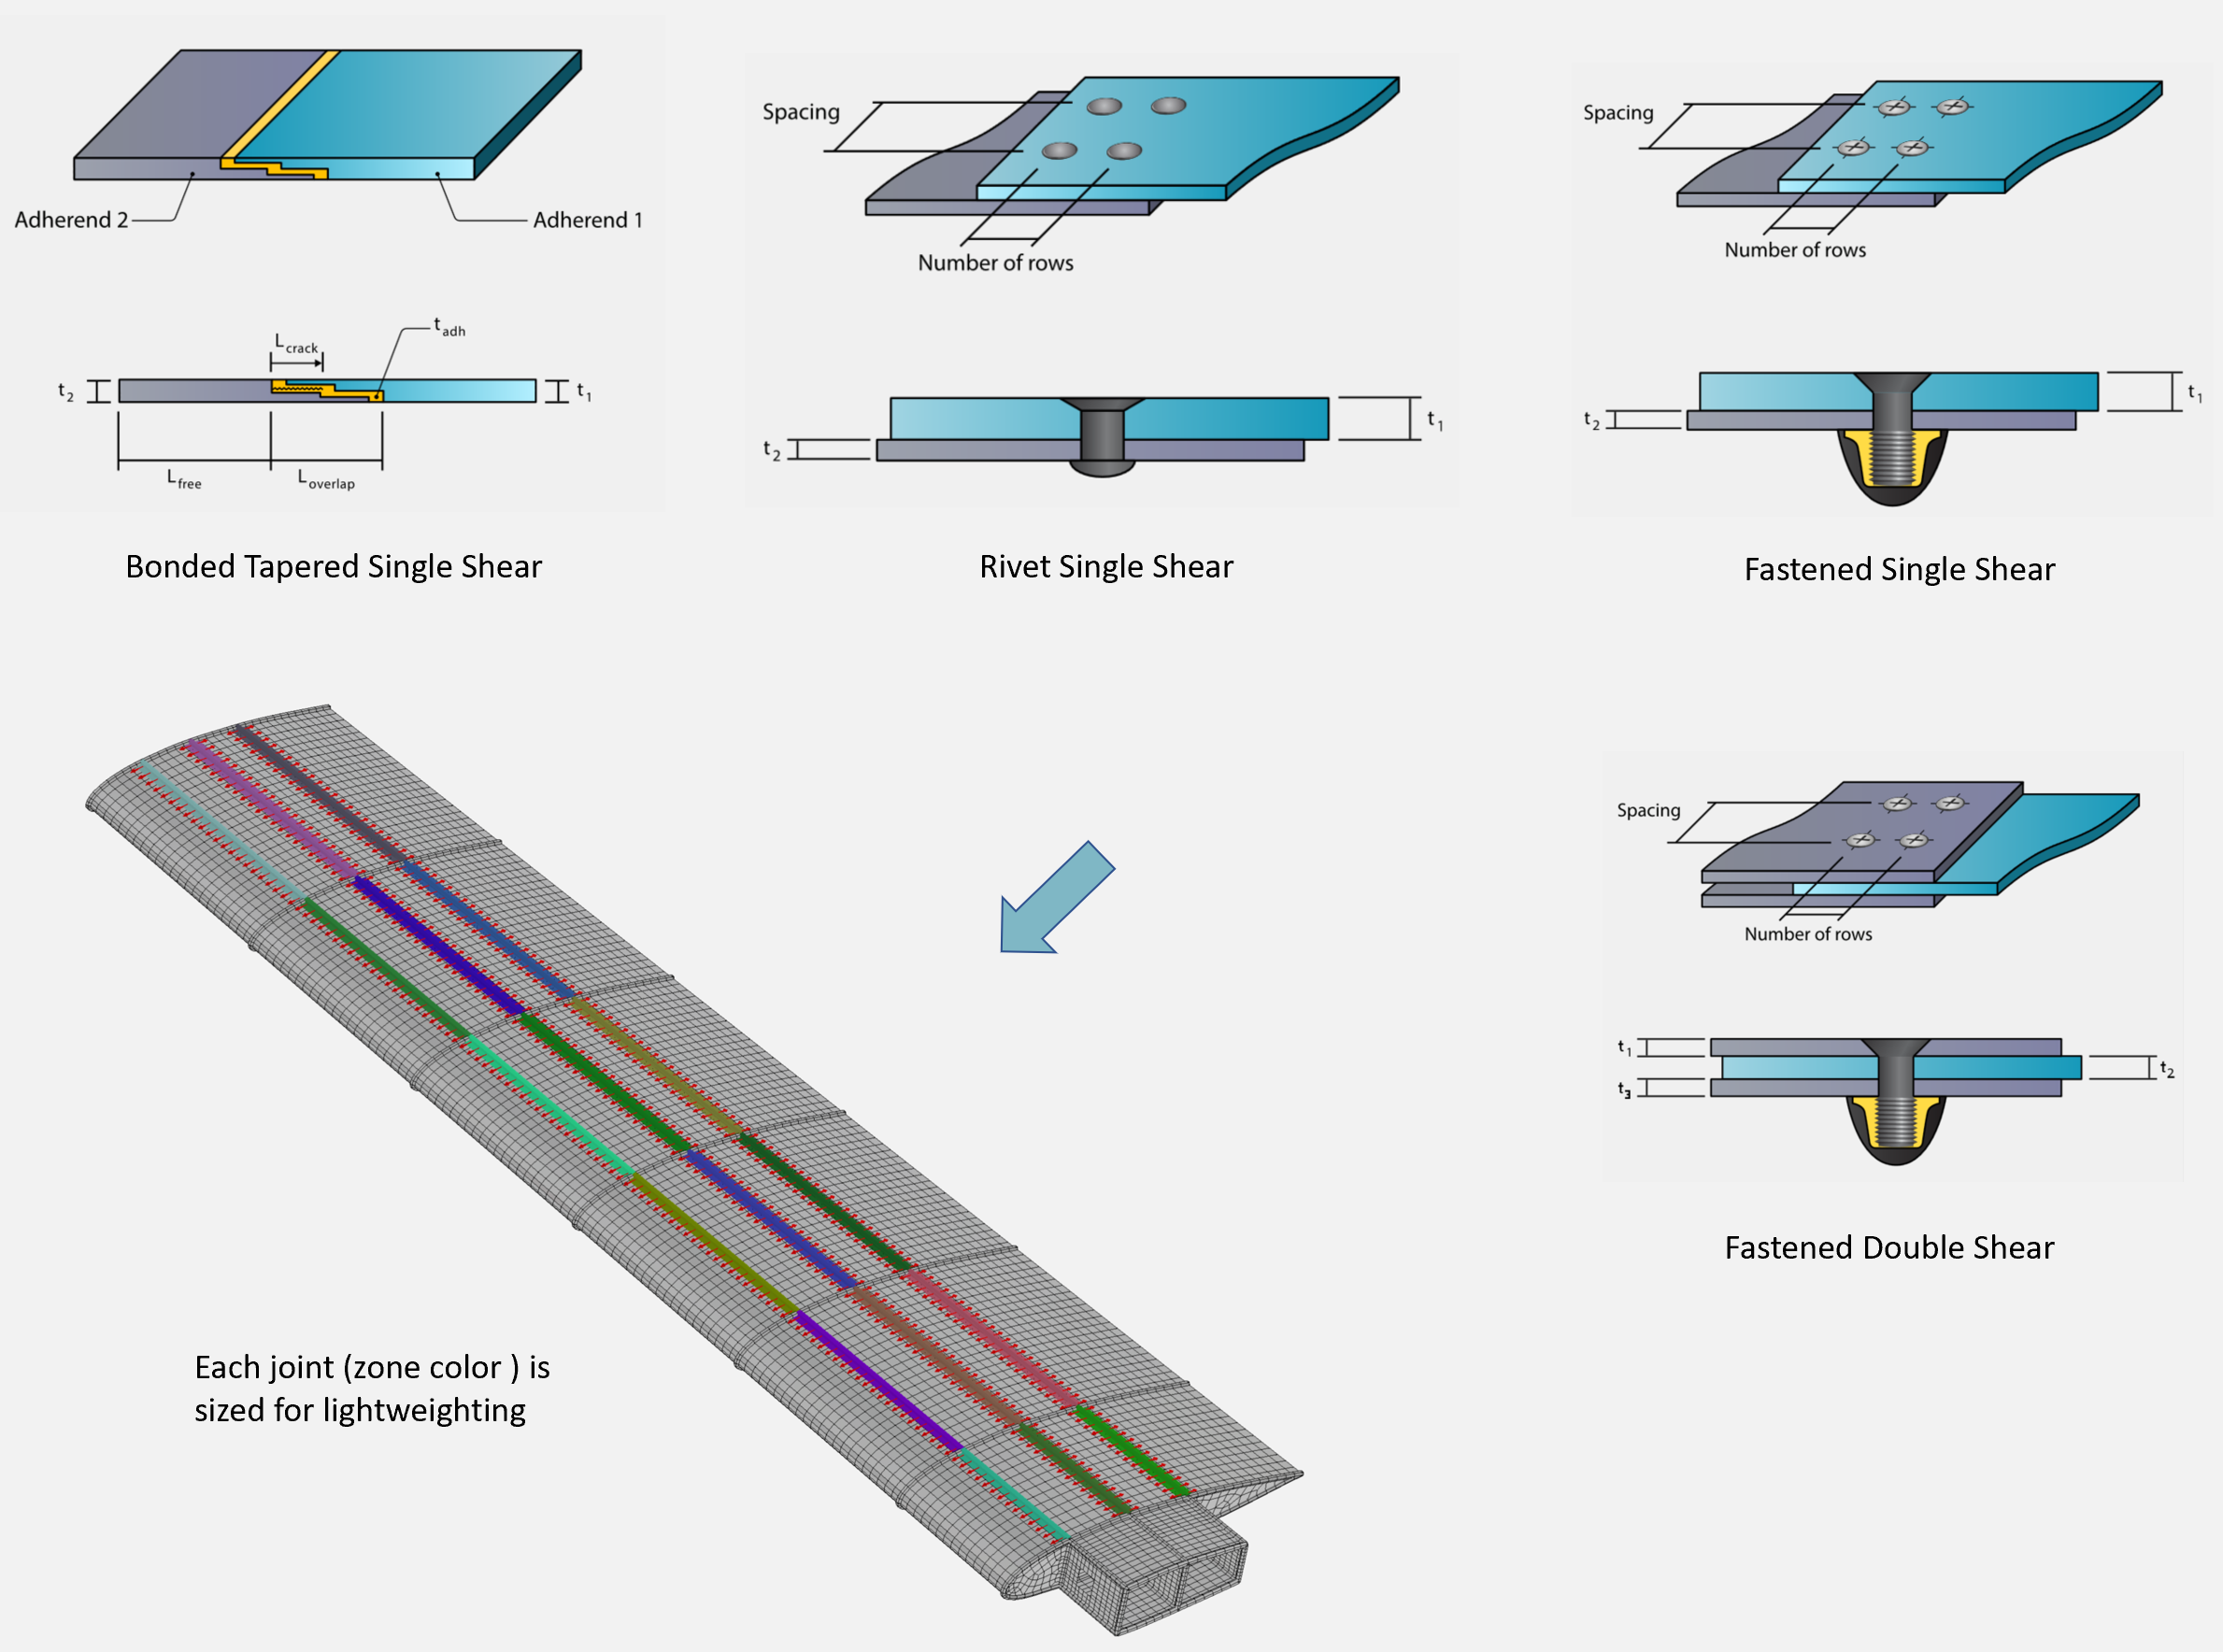

Different fastened, riveted, and bonded joint concepts evaluated for spar to wing skin.
Joint sizing can be performed after acreage panel sizing or concurrently. Either is seamless in HyperX.
For producibility, the objective is to find consistency across joints – that is the use of the same fastener type and diameter as reasonable. Joints are also sized to find a positive margin without necessitating a change to the acreage design.
Skin Joint
Wing skin joints may have the skin continuous across substructure such as spar caps. They can also be spliced together as discontinuous joints. The way in which the fastener bearing and bearing by pass is calculated is different between the two.
Continuous Skin
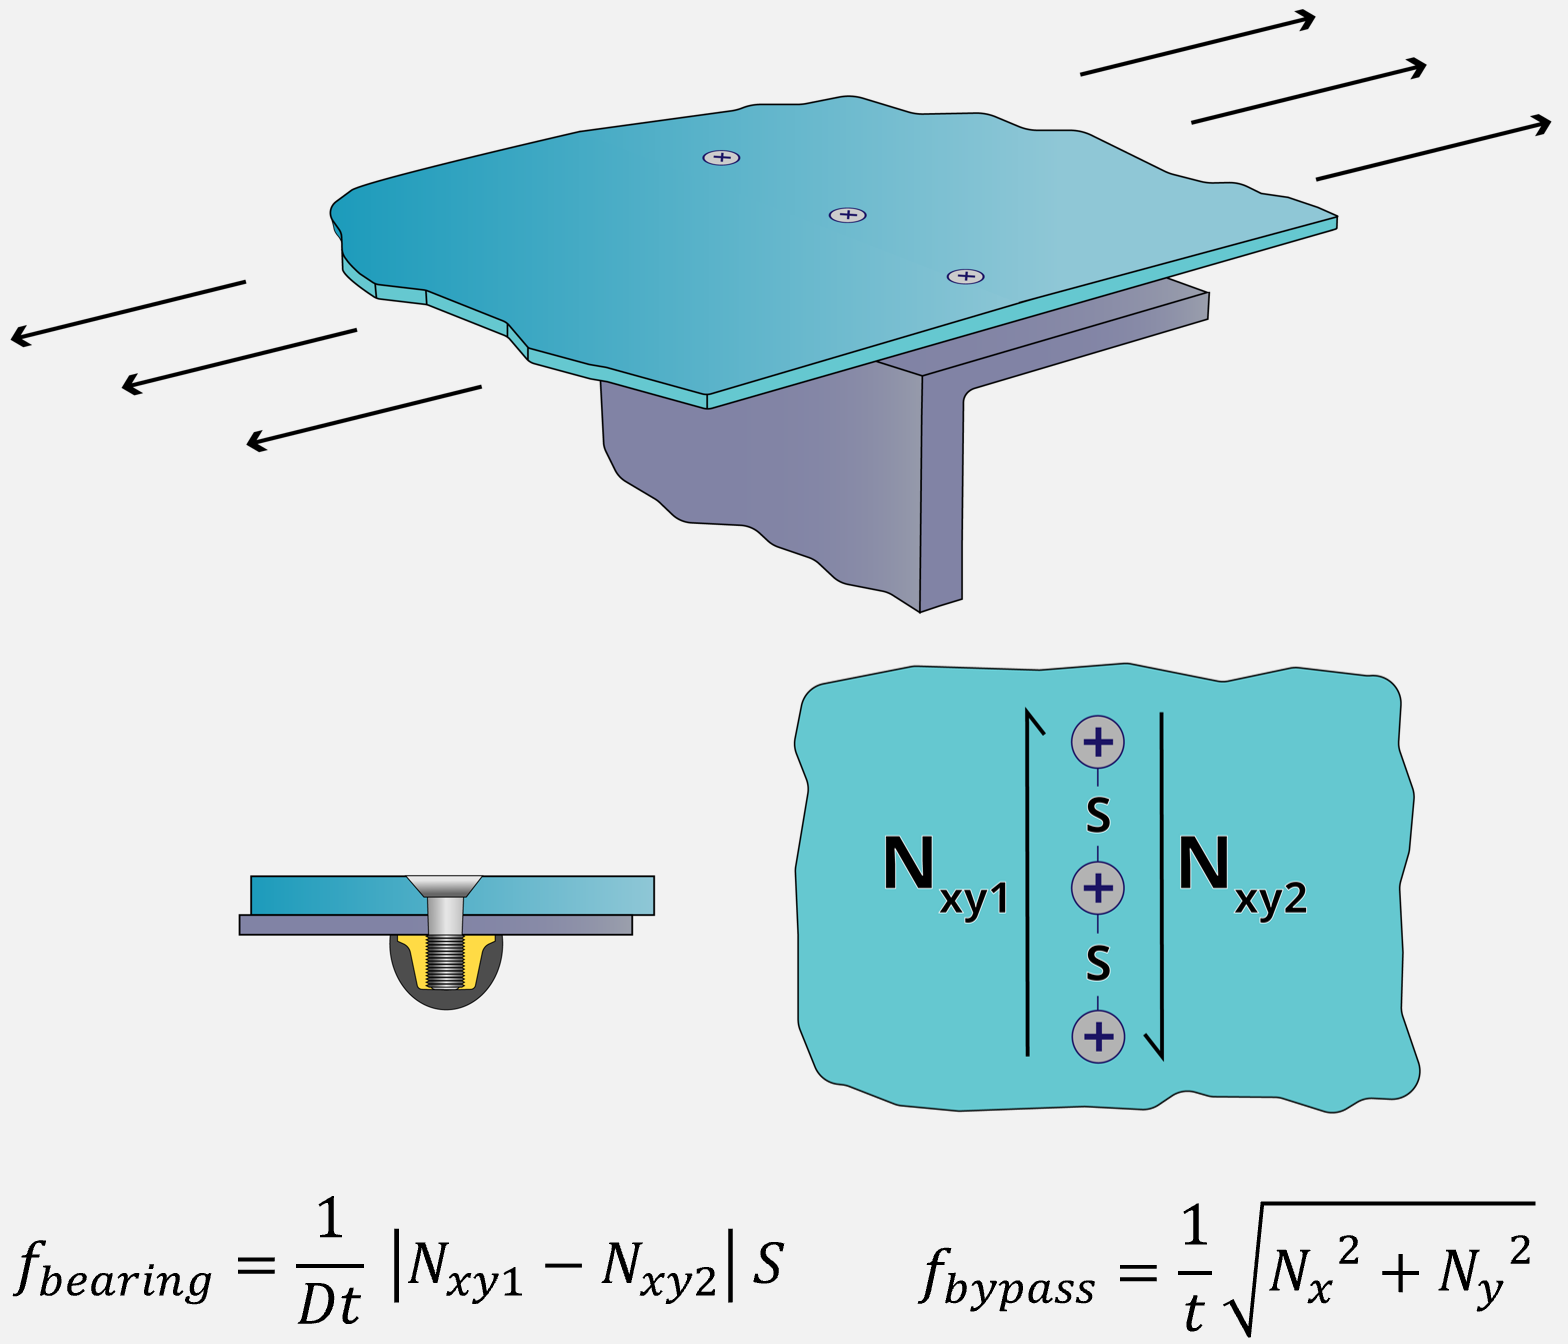

Discontinuous Skin
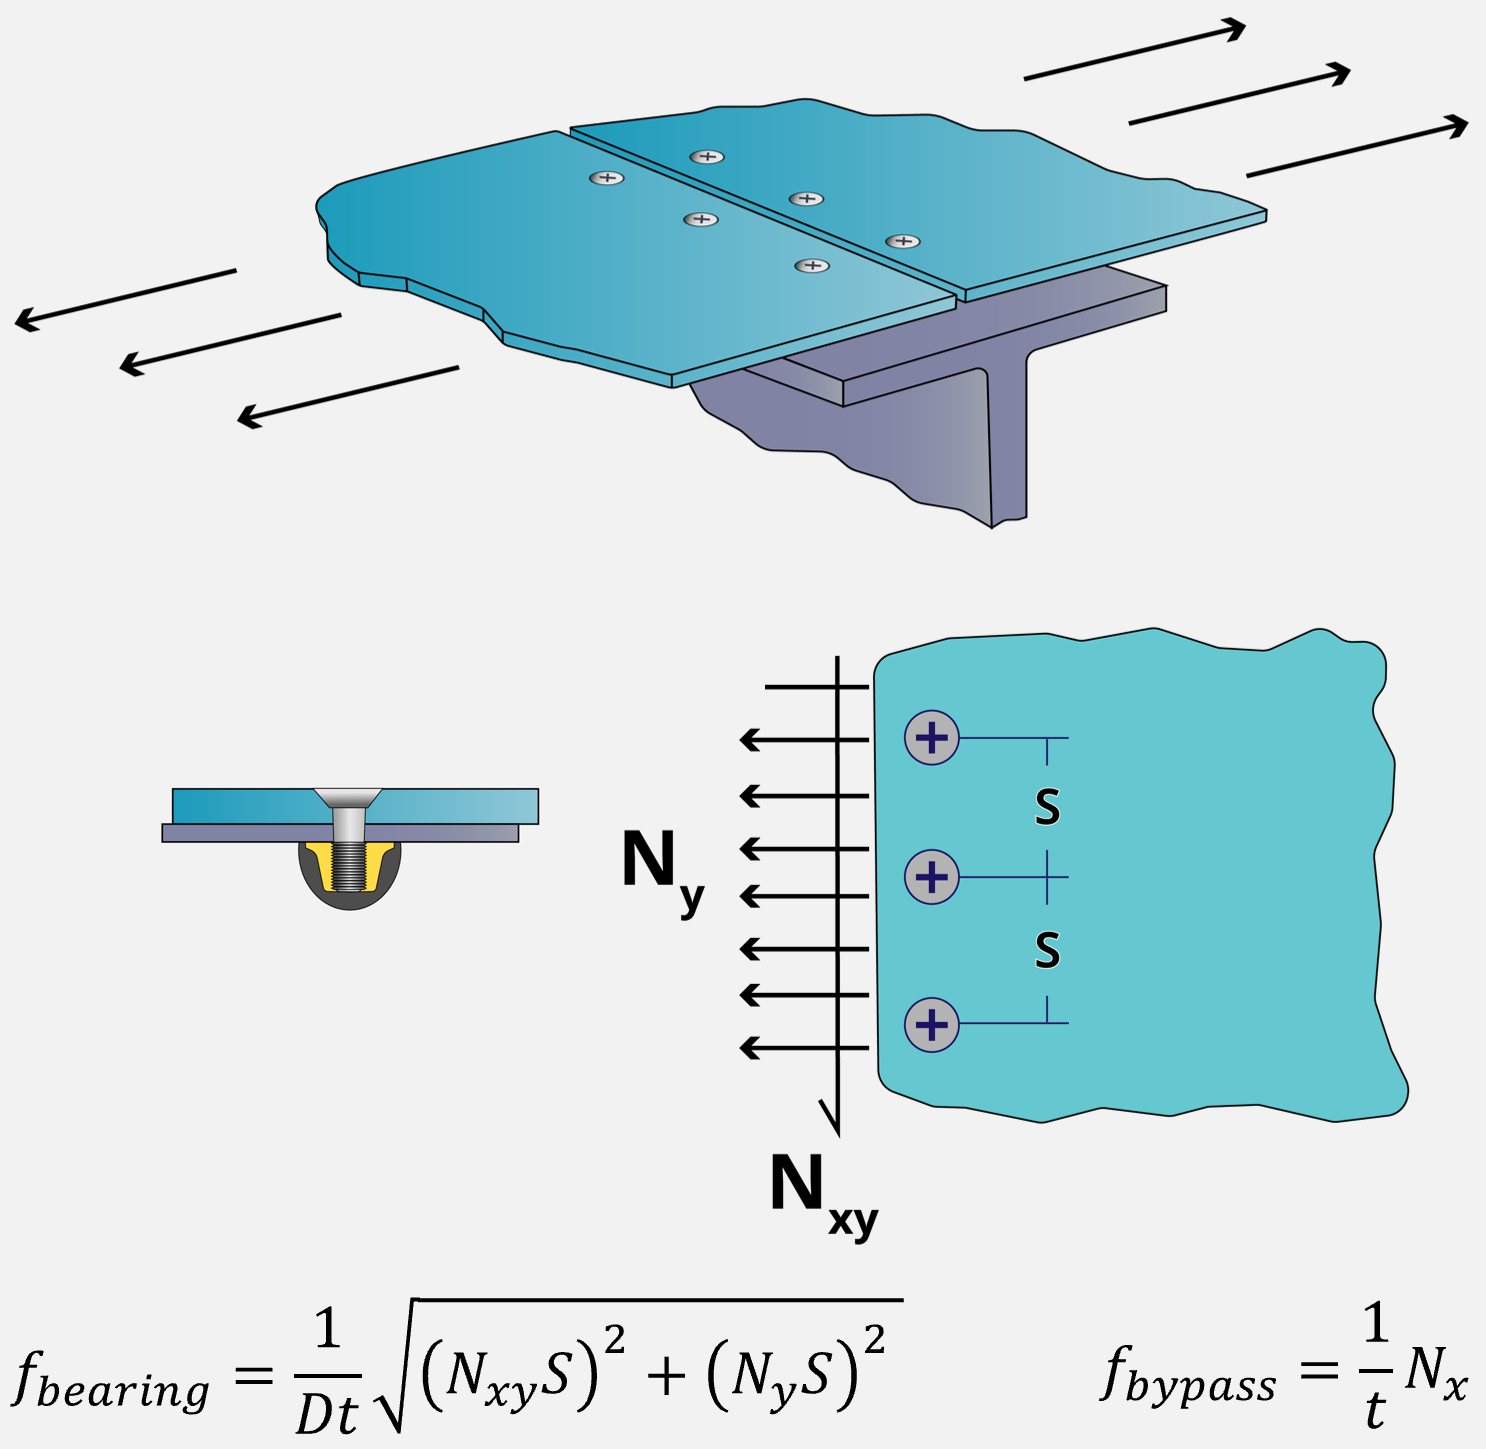

FEM Joint
A FEM joint is a HyperX derived entity. They are generated automatically from the intersection of structural zones. One- and two-member line joints are used for load processing.
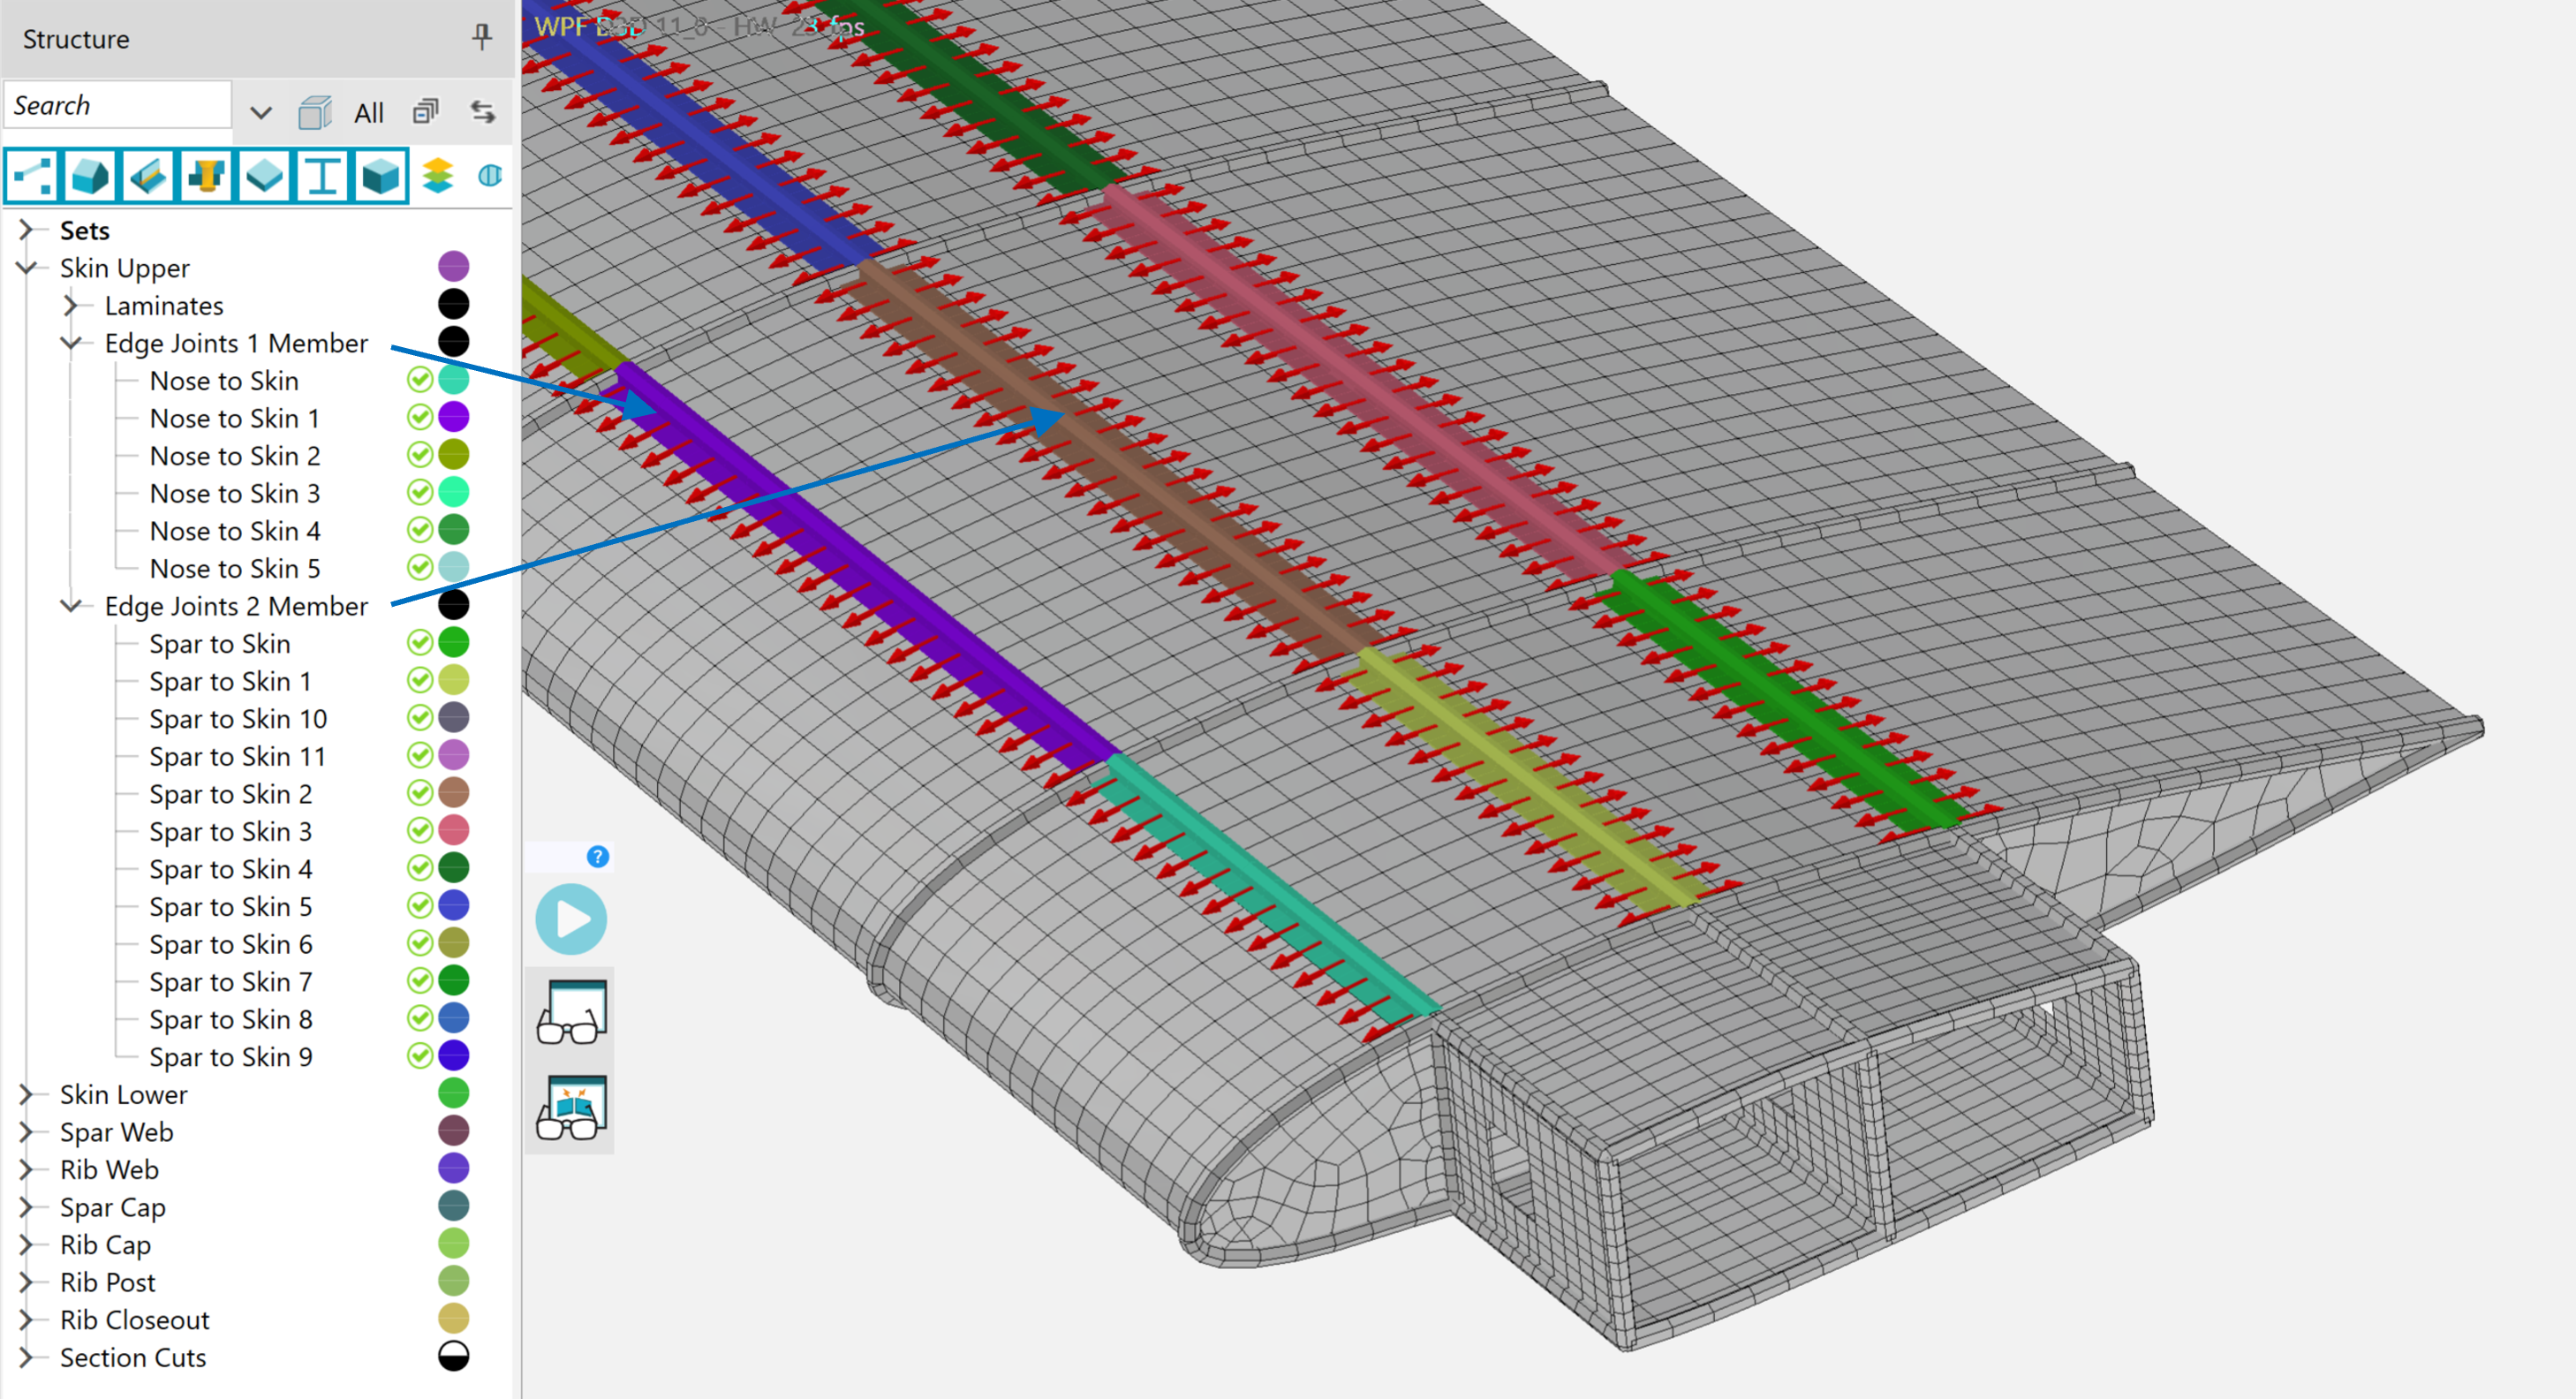

HyperX FEM joints: one- and two-member load processing.
Joint loads are established in HyperX defined joint coordinate system based on the joint’s geometry. The same load processing techniques as provided for panels are also provided for joints; such as element by element, element average, peak element, and statistical.
Structural joints, such as between wing spar substructure to upper and lower skin surfaces, are automatically identified and made into HyperX entities.
One Member
Some structural joints are analyzed and sized with the load coming from one attaching surface. One member joints have all load from one side passing through either a fastener as bearing, or through the adhesive bondline as shear stress.
In the wing example, the nose skin is made separately and is joined to the acreage skin. This construction joint can be either bonded or fastened. All of the load from the nose skin transfers through the joint to the other skin surface.
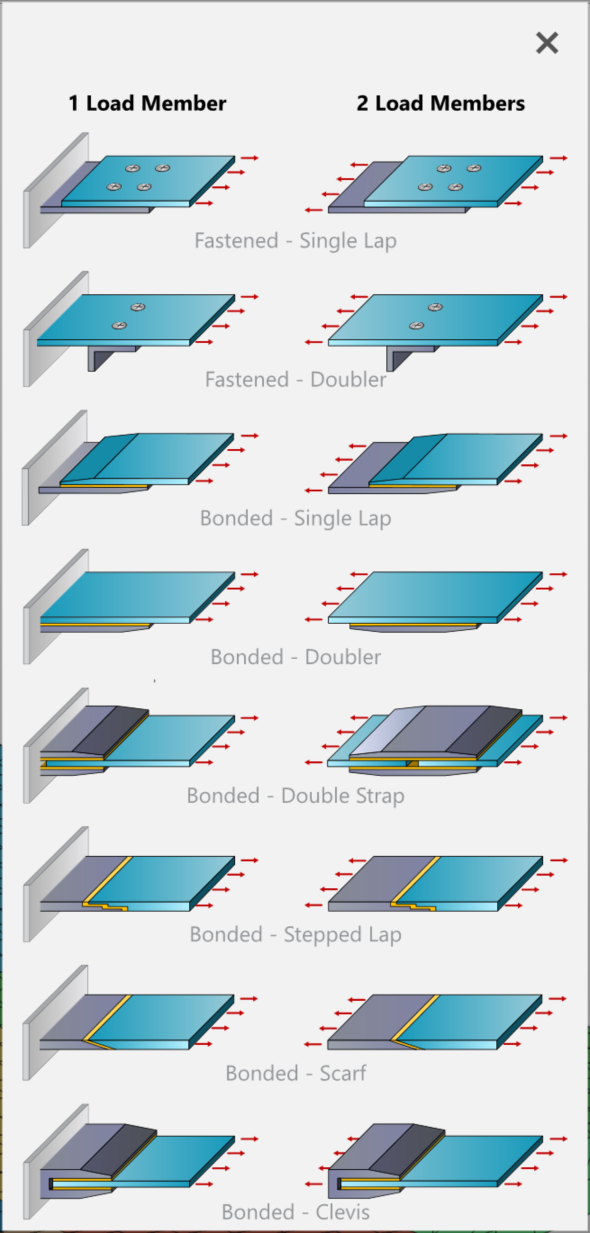

Two Member
Other structural joints are analyzed and sized with the loads coming from both sides. The two-sided loads are processed differently than one sided. Essentially the load used to analyze the joint is the difference (delta load) of shear and axial load perpendicular to the joint
In the wing example, the acreage skin is fabricated as a one-piece laminate attached to spar caps. This joint between spar cap and skin is identified as two-member joint as the load passes through the continuous skin laminate over top of the spar cap. The joint can be either bonded or fastened. If fastened, only some of the load goes into fastener bearing, while the remaining load is bearing by pass.
Bearing force exerted from the fastener to the composite hole and the resulting bearing by pass will likely cause the edge band laminates to size thicker. To minimize sizing this laminate thicker, efficient joint sizing also contributes to weight savings.
Edge Allowable Joint
Design of a joint begins with edge allowable joints. FEA loads are extracted in the joint coordinate system and compared to pull off and shear allowables.
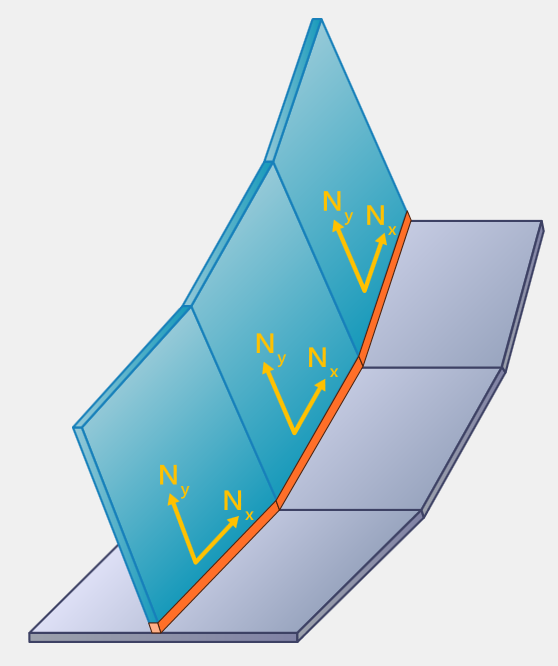

Edge allowable joint.
This is useful in quantifying where peak joint loads occur, for what load cases, and their magnitudes. Doing so establishes the feasibility of different joining techniques. The engineer is informed of the amount pull off and shear load each joint must carry.
Fastened Joint
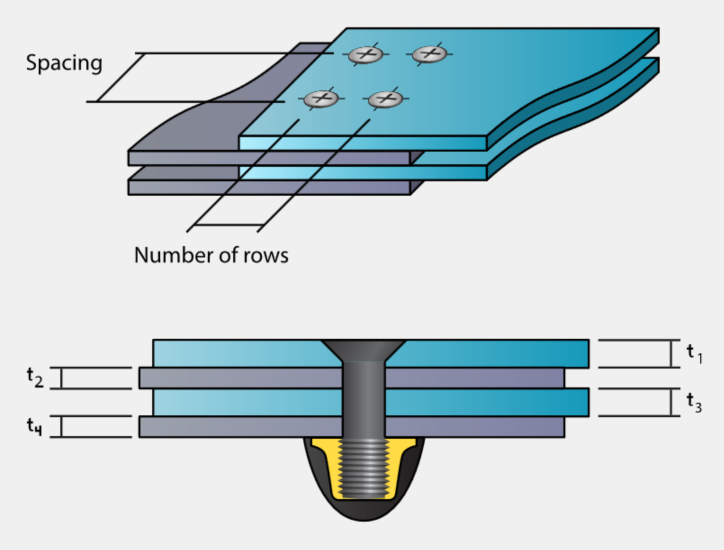
Fastener types, diameters, spacing, and number of rows are sized. Analysis include fastener bearing and bearing-by-pass on the laminate. NASA 5020 analyses include pull off and torque.
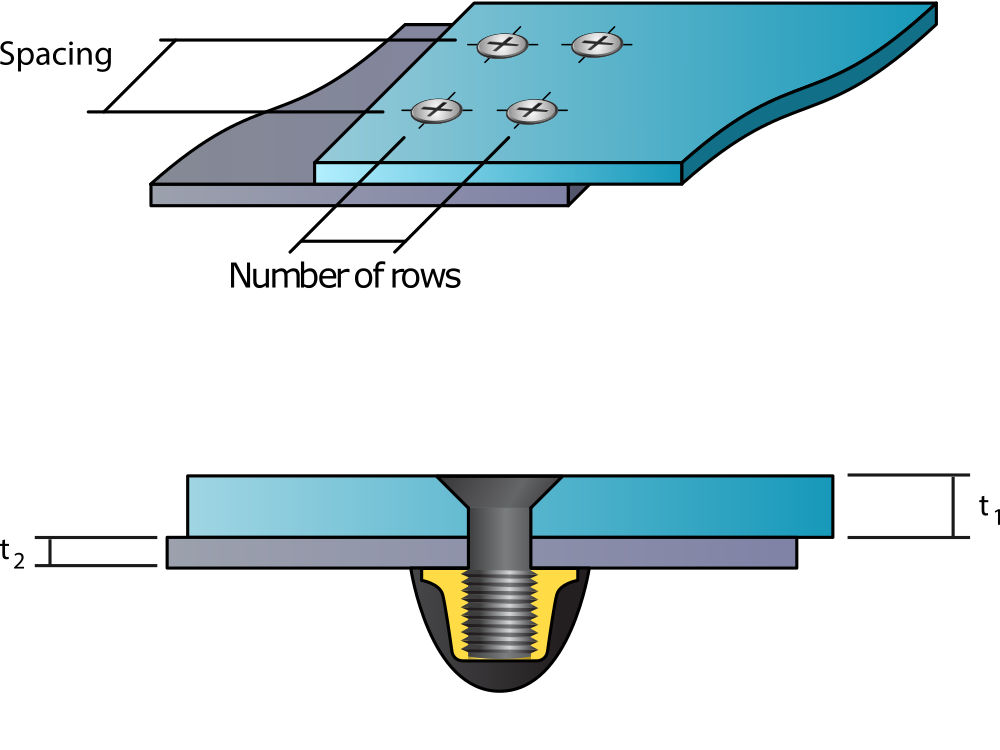

Single Shear
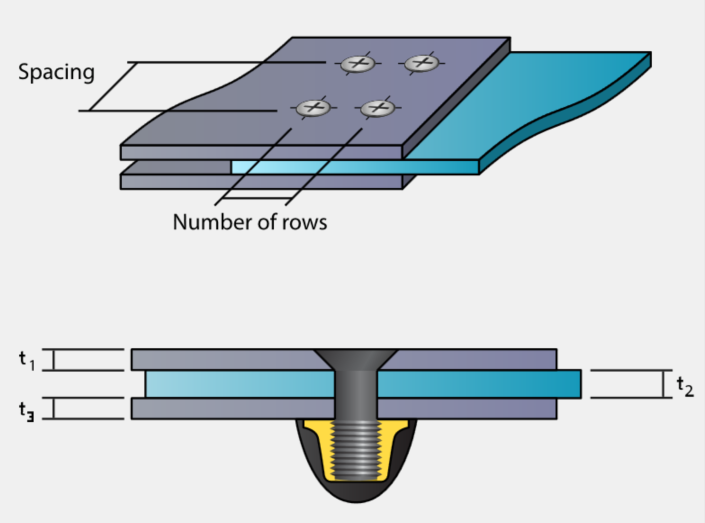

Double Shear

Triple Shear
Metal and composite bolted joints are frequently used in aerospace. Single, double, and triple shear joint concepts are available.
Fastened joints can be assigned to HyperX FEM line joints. Shear flow is used to quantify the force in each fastener.
Fastened joints can also be defined from FEM point joints, where connector elements like Nastran CBUSH or CELAS and Abaqus CONN3D2 are used.
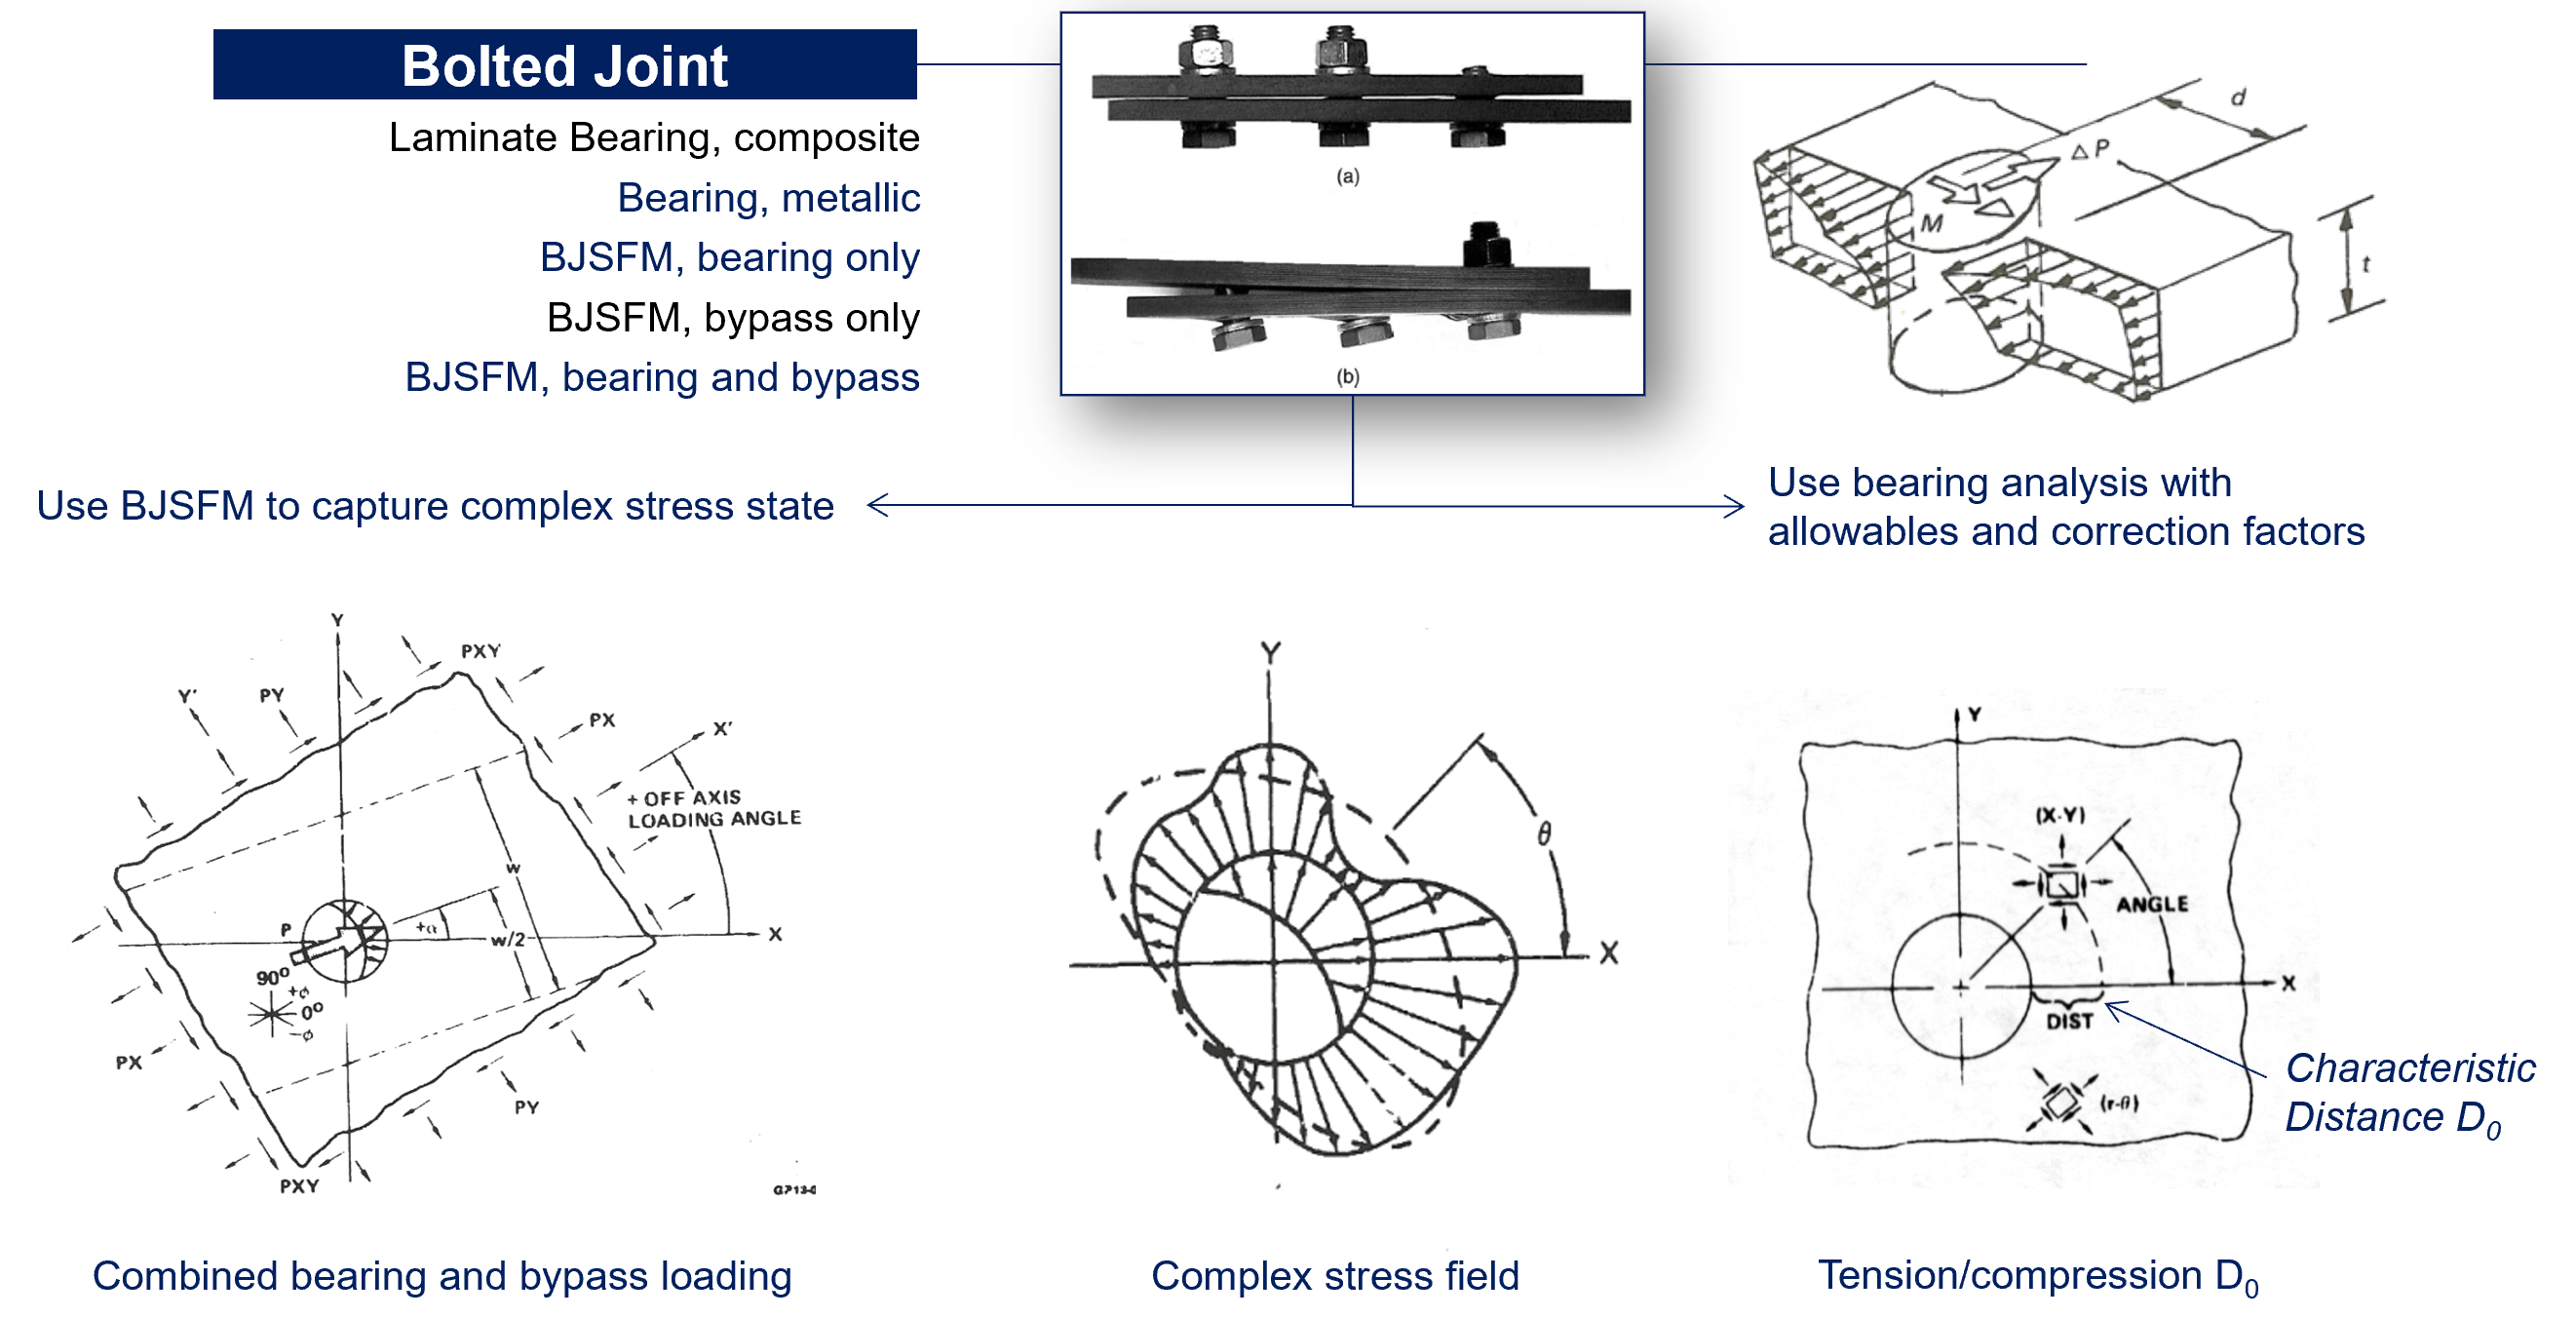
In both line and point joint approaches, bearing by pass is also extracted from the FEA and used in the analysis and sizing.
Once the bearing and bypass loads are established, analysis can be performed using bearing allowable curves or numerical methods such as BJSFM.

Rivet Joint
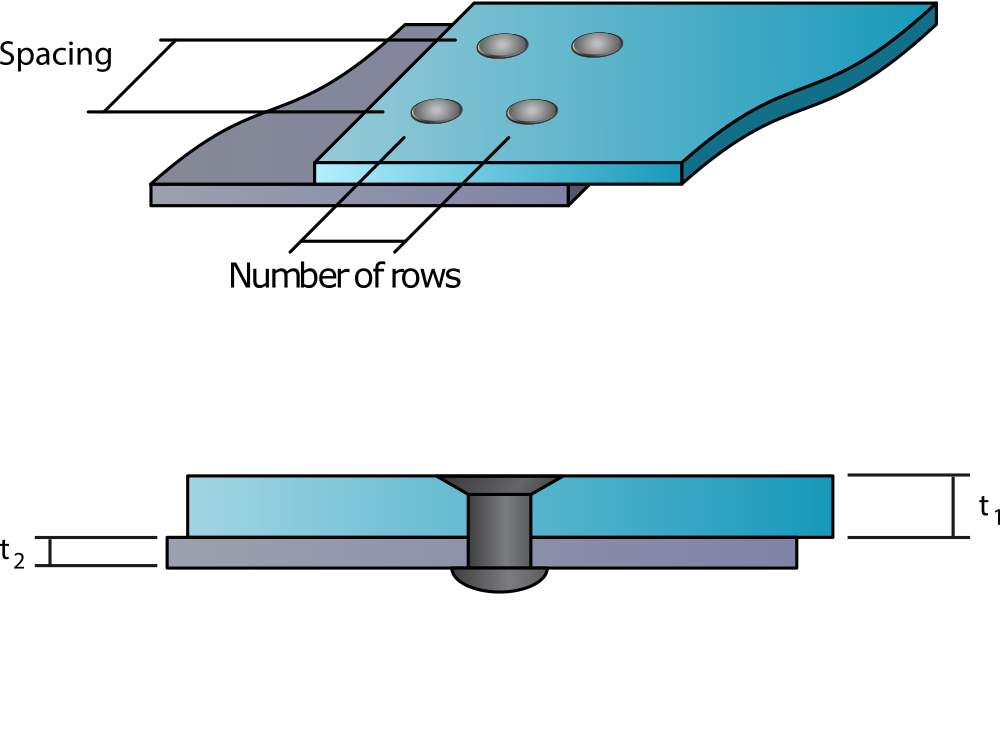
Rivet types, diameters, spacing, and number of rows are sized. Analysis is based on allowables from testing rivet and sheet metal combinations.

Single Shear
Rivets are commonly used wing and fuselage sheet metal joints to substructure.
Bonded Joint
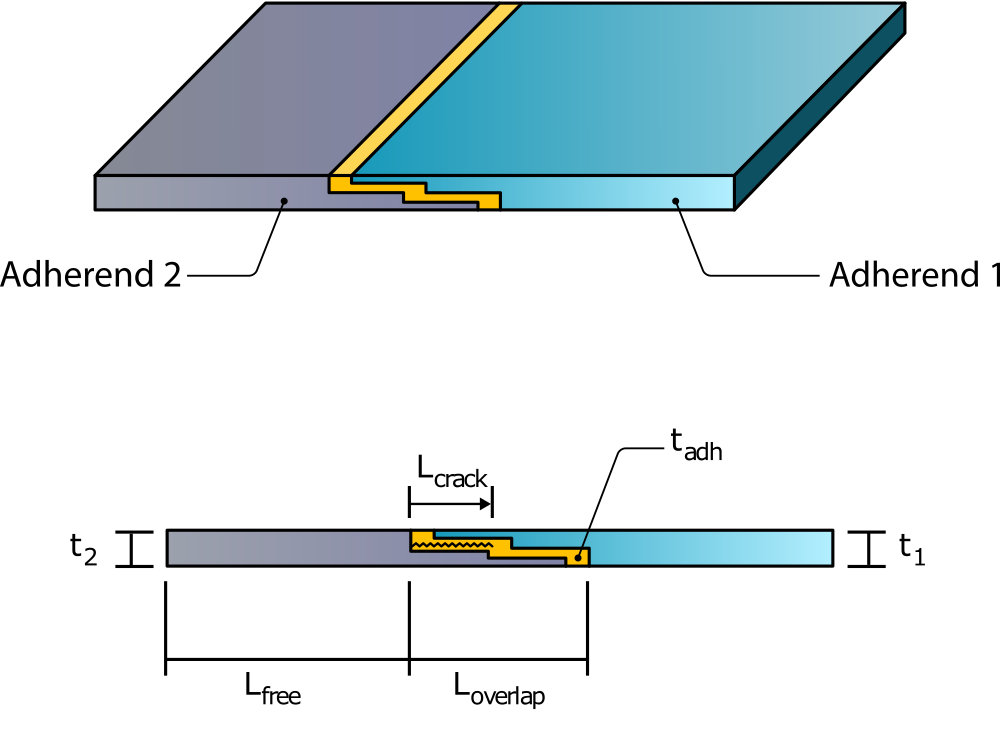
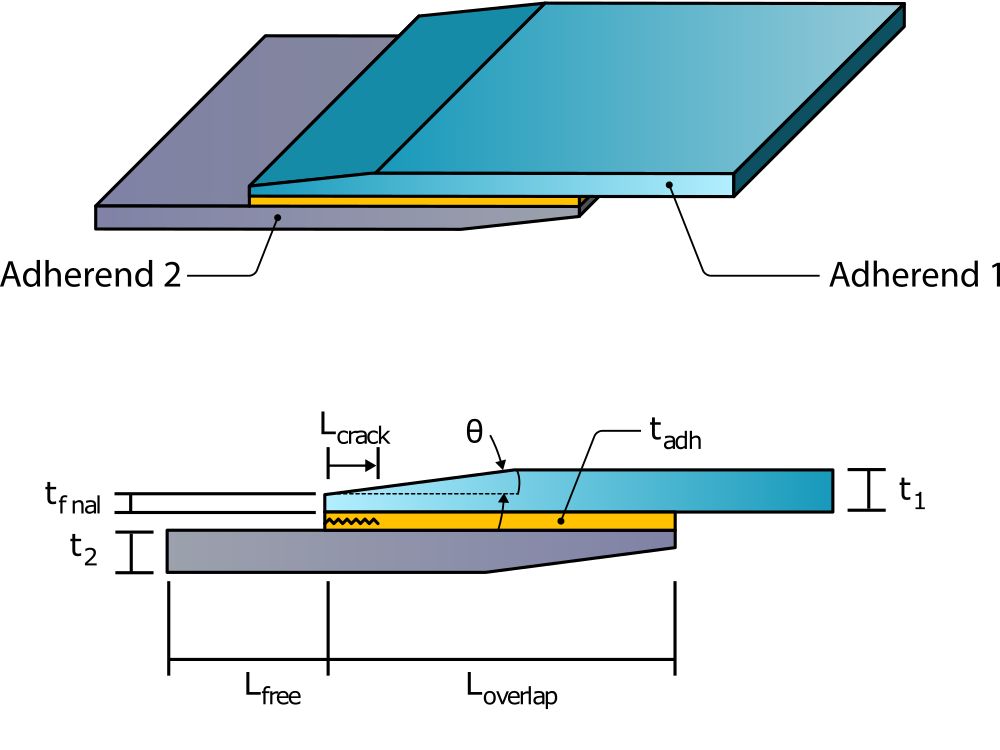
Adhesive material, thickness, overlap length, and taper angle are sized. Analyses include linear/nonlinear peel and interlaminar shear stresses; and VCCT energy solution for disbonds.

Single lap stepped

Single lap tapered
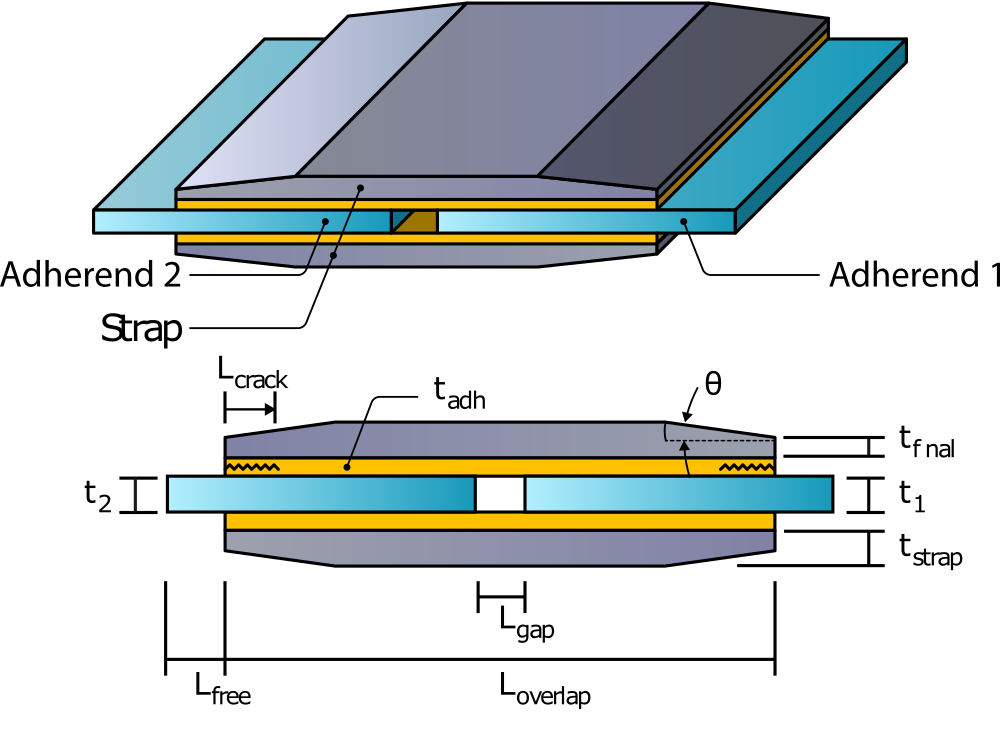

Double lap tapered
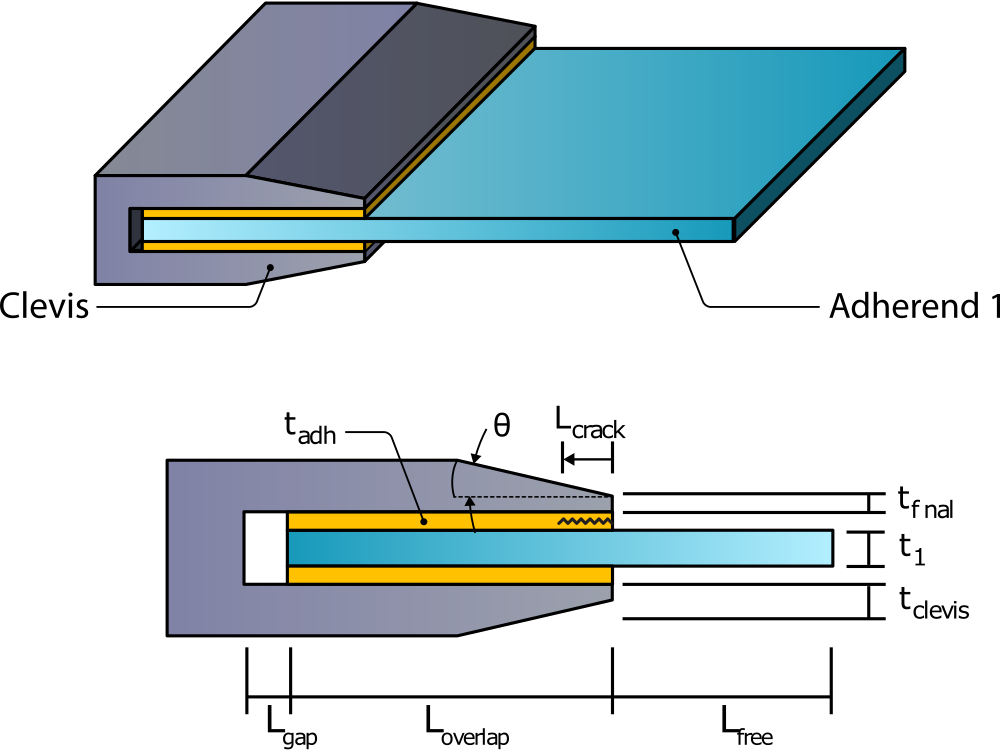

Clevis
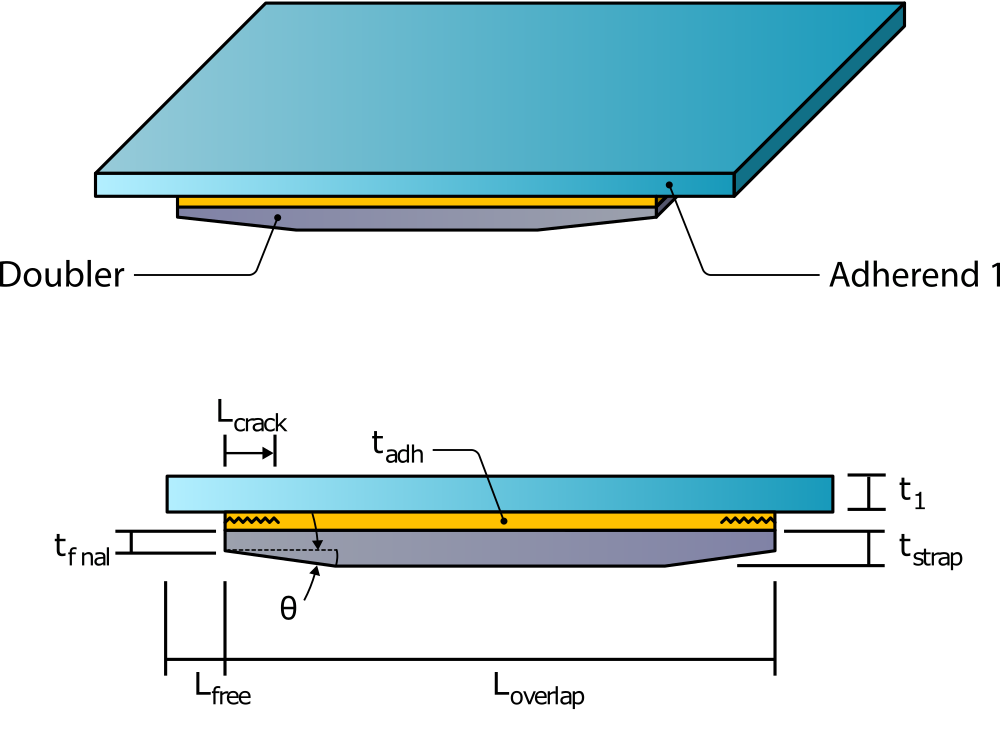

Double tapered
Metal and composite bonded joints are used in aerospace for lightly loaded or secondary structure. They are used also for composite stiffened panel stiffener to skin bond, illustrated in figure. Single lap, double lap, stepped and tapered joint concepts are available.
All in-plane σ1 σ2 τ12 and out-of-plane σ3 τ13 τ23 stresses are computed in the adhesive and adherends ply-by-ply. Many stress-based failure criteria for the adhesive and plies are provided and applied at an appropriate characteristic distance from free edge.
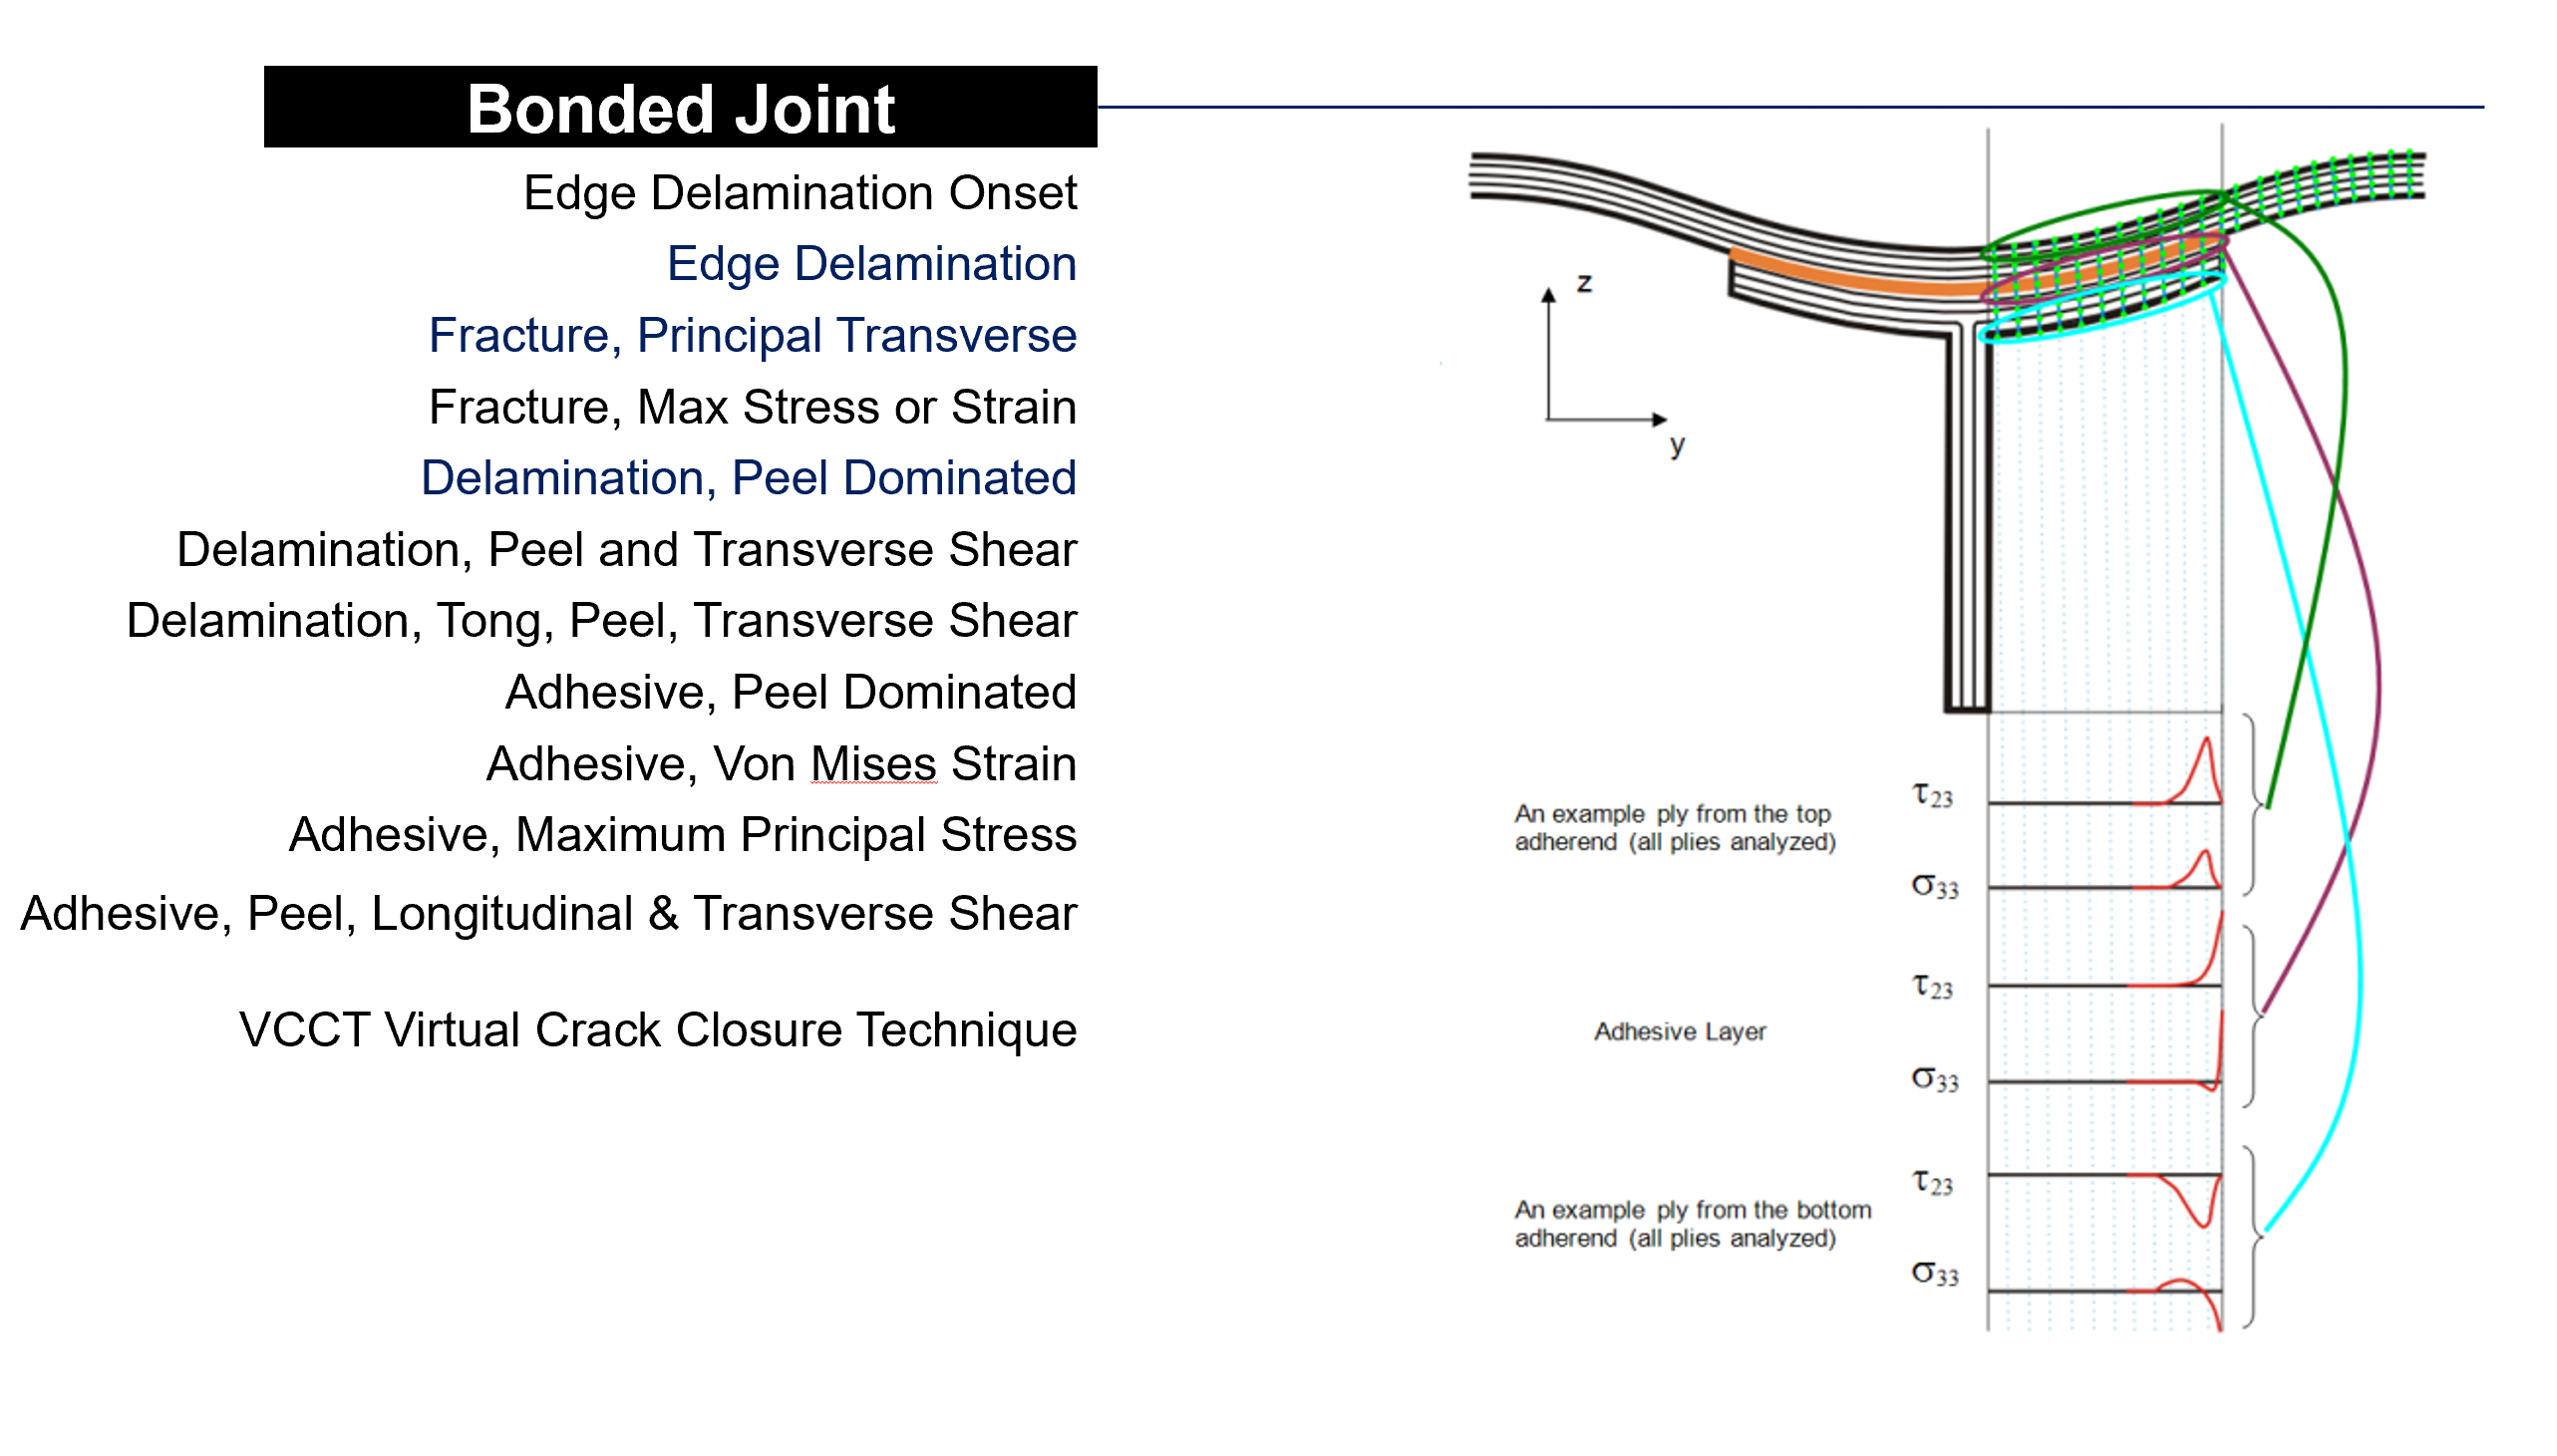

A ‘Tee’ stiffened panel bonded joint analysis of the attached flange to skin (exaggerated deformation)
The Virtual Crack Closure Technique, VCCT, accounts for the FAA requirement of a possible undetected crack in the bond line, usually assumed ¼” in length. It is an energy method to quantify residual load carrying strength.
Contact Us
This site is protected by reCAPTCHA and the Google Privacy Policy and Terms of Service apply.
